

Home windows Terminal nonetheless seems like one thing solely IT people hassle with, though Microsoft has been pushing it because the default for a couple of years. I get the resistance as a result of clicking via menus is comfy. Whereas most duties do not really want a command line, there is a small record of instructions I would argue anybody operating Home windows ought to hold useful, alongside different Home windows instructions which are simple to study however make an enormous distinction. None are intelligent or unique; they only do widespread jobs quicker than the GUI ever will.
Associated
This Free Instrument Solves the Most Frequent Home windows Complications—Effortlessly
Remedy your points whereas saving dozens of clicks.
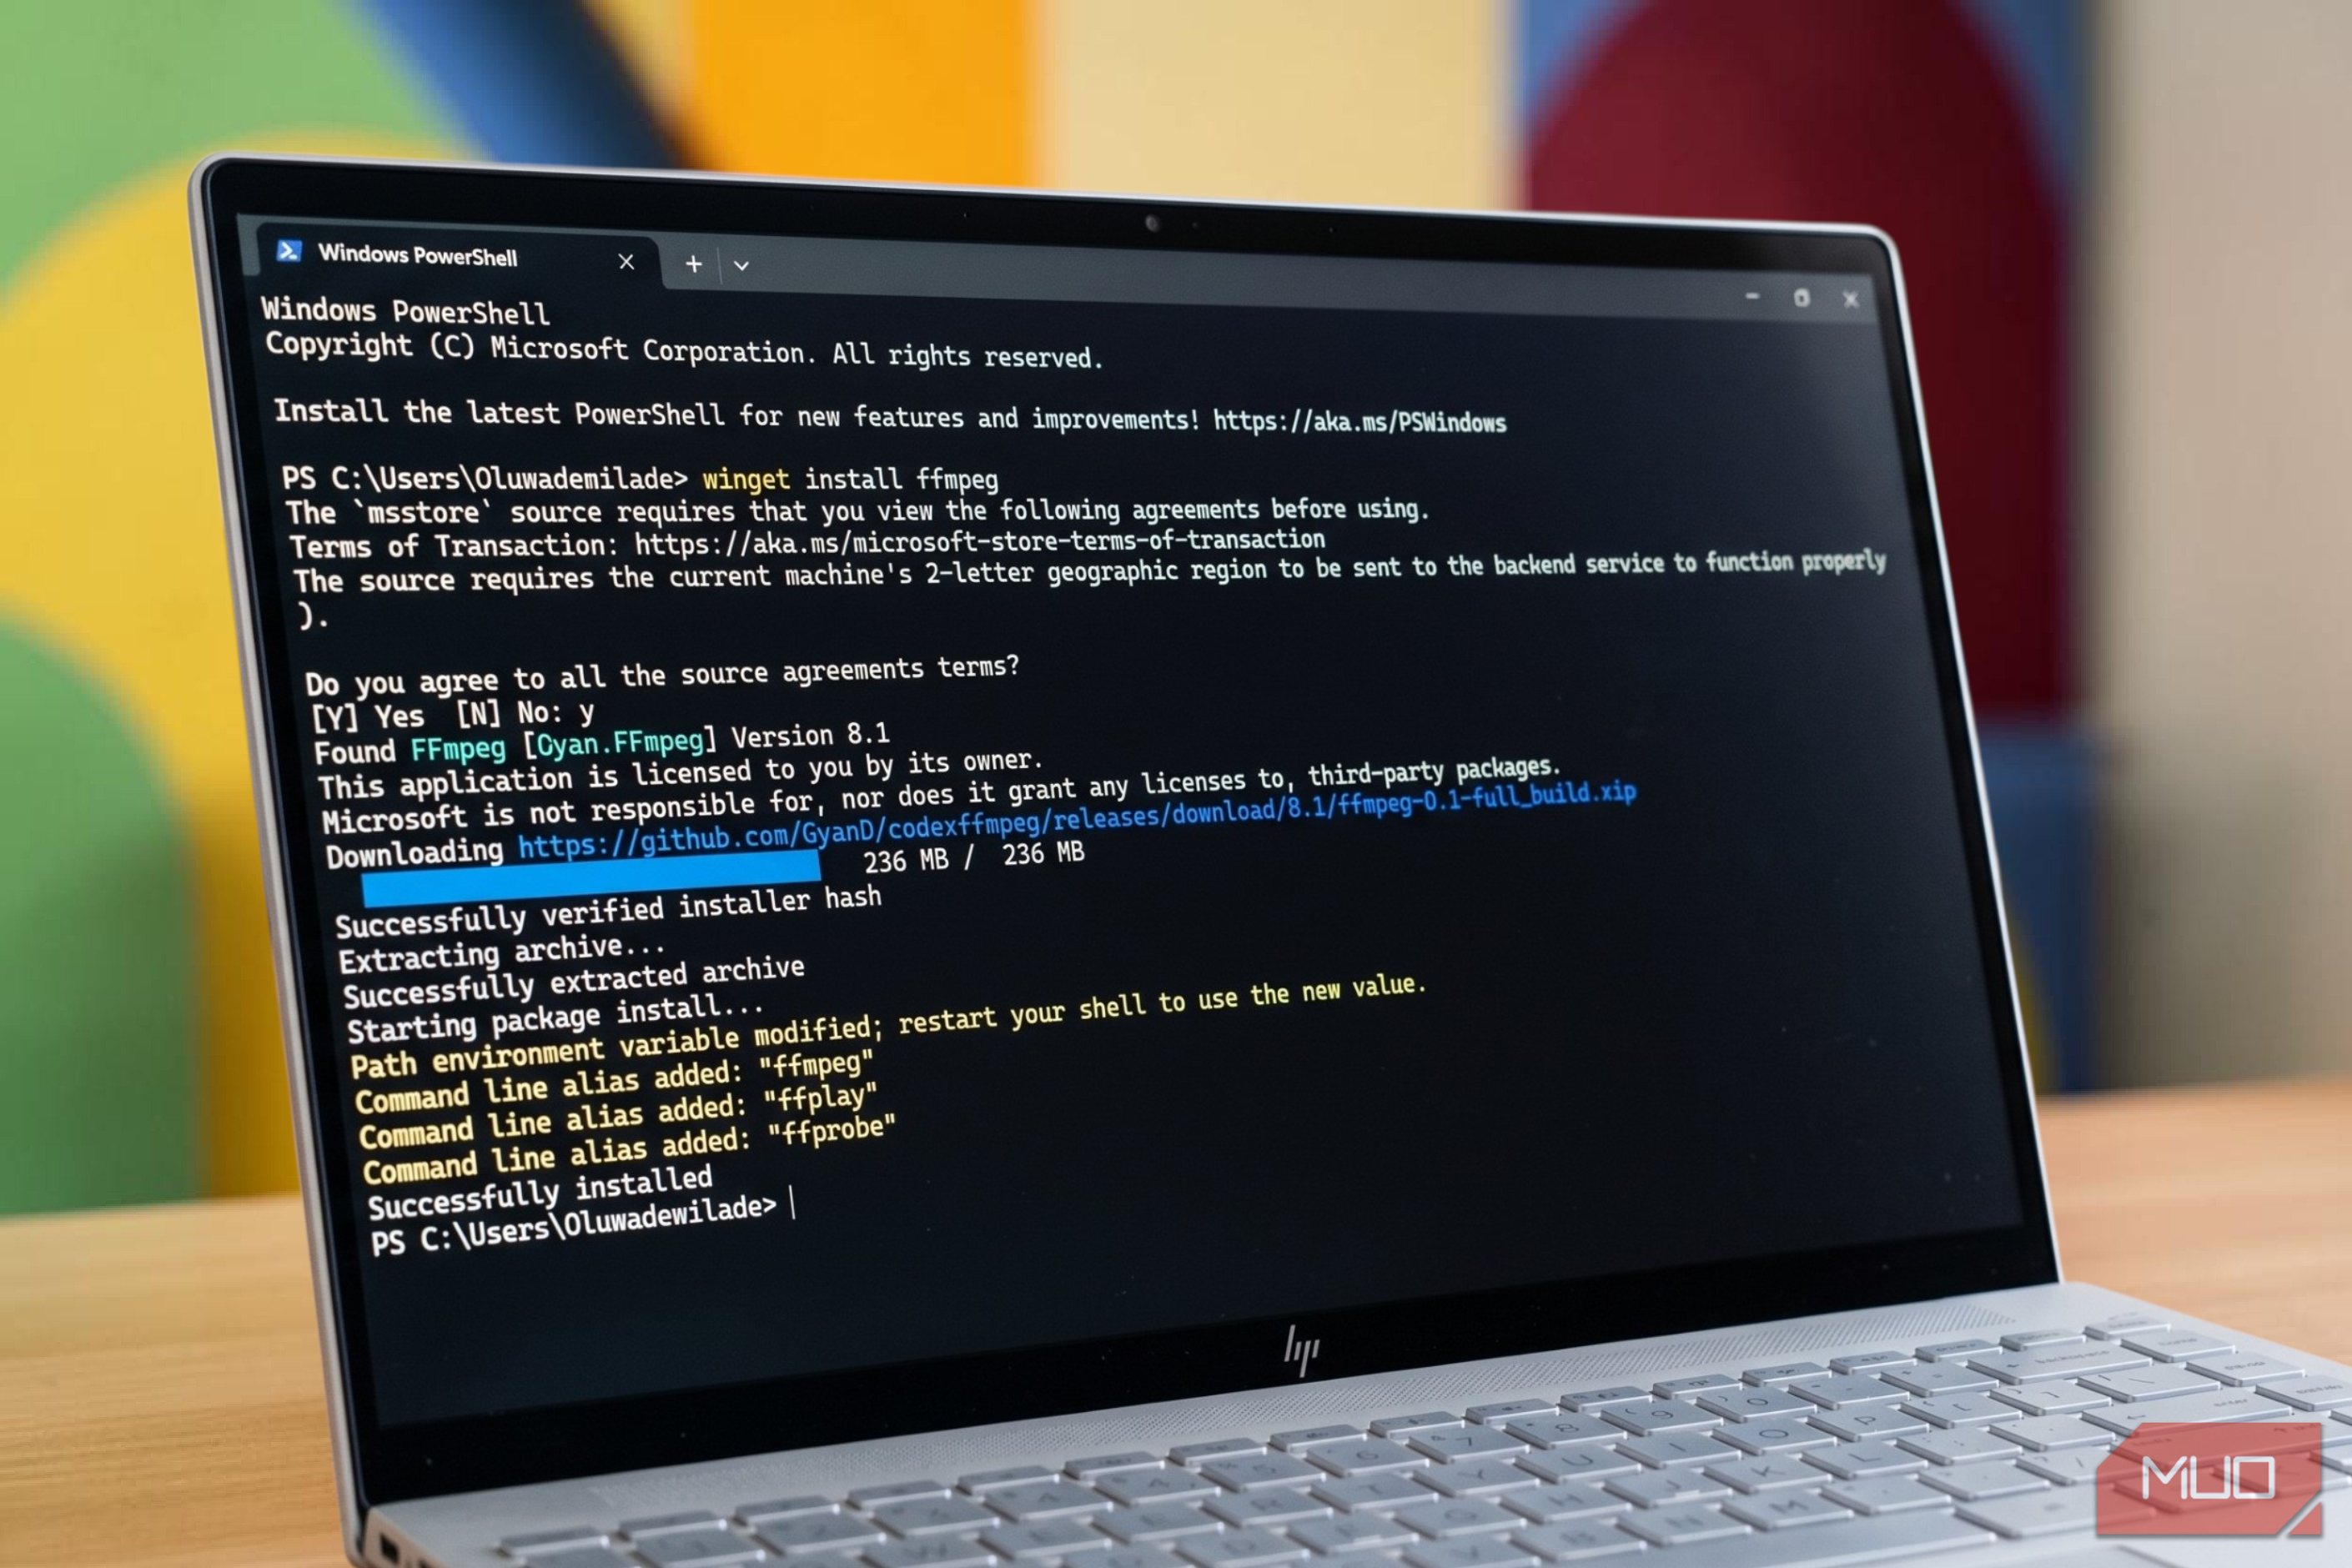
Replace a number of apps in your PC with Winget
No extra chasing twenty totally different installers throughout twenty totally different web sites
Updating apps on Home windows is a slog when you do it the guide manner — open every program, dig via its menus, hit Verify for Updates, then transfer on. Some apps do not even examine on their very own. Fortunately, Winget collapses the entire routine right into a single line.
If you have not used it, Winget is Microsoft’s built-in bundle supervisor that ships with Home windows 11 and is hands-down one of the best ways to put in apps on Home windows. To run a sweep:
- Press Home windows + S, sort Terminal, and decide Run as administrator.
- Kind winget improve –all and hit Enter.
- Settle for the supply agreements if prompted (solely occurs the primary time).
Winget pulls a listing of each app it acknowledges, checks every one towards its supply in Microsoft Retailer, the developer’s web site, or the official bundle repo, and queues up no matter’s outdated. A typical run on my machine catches Spark Mail, Notion, Zoom, 7-Zip, and a handful of others.
It isn’t excellent protection. Winget could not handle all auto-updating apps, relying on how they’re registered with the bundle supervisor, and some obscure packages will not be within the catalog in any respect. However for the majority of what most individuals set up, a single command replaces 20 separate guide checks.
Run winget improve with out the –all flag first. It lists every thing that wants updating with out truly beginning the method, so you’ll be able to see what’s about to alter.
Restore corrupt Home windows information earlier than you reinstall
SFC and DISM clear up the mess earlier than a contemporary set up turns into your solely possibility
A reinstall feels productive when Home windows begins misbehaving, however it prices you a full afternoon spent resetting apps, signing again in to accounts, and discovering that one license key you swore you saved someplace. Two instructions deal with most of what folks reinstall to repair.
The primary is System File Checker. It scans protected Home windows information, compares them towards a clear cache, and replaces something that is been corrupted or modified. To run it:
- Open Terminal as administrator.
- Kind sfc /scannow and hit Enter.
- Look ahead to the scan to complete — it normally takes two to 5 minutes.
If SFC studies issues it may’t repair, that is the place DISM is available in. The Deployment Picture Servicing and Administration software repairs the underlying Home windows picture that SFC pulls from, which is why it is price operating second. The command is DISM /On-line /Cleanup-Picture /RestoreHealth, and it will pull alternative information from Home windows Replace.
DISM wants an web connection to obtain alternative information. In case your PC is offline or Home windows Replace is damaged, you’ll be able to level it at a mounted ISO with the /Supply: flag as a substitute.
Neither command will repair a {hardware} failure or a malware an infection. Nonetheless, for the foggy software program gremlins that make Home windows really feel barely off, operating these two in sequence resolves the issue extra typically than it does not — they usually’re two of the PowerShell instructions that repair most of my Home windows issues.
Reliably transfer big folders utilizing Robocopy
File Explorer wasn’t constructed for tons of of gigabytes
Screenshot by Yasir Mahmood
File Explorer is ok for on a regular basis drag-and-drop, however it falls aside on huge transfers. There’s truly a easy purpose why File Explorer takes without end to begin copying, and Robocopy sidesteps it. It has been constructed into Home windows since Vista, and it is the identical software IT departments use to reflect servers. The essential syntax is easy:
robocopy “C:supply” “D:vacation spot” /MIR /Z
These two flags are necessary:
- /MIR mirrors the supply folder precisely. It copies every thing, together with subfolders, and removes something within the vacation spot that is not within the supply.
- /Z runs the copy in restartable mode, so if the switch will get interrupted midway, it picks up the place it left off as a substitute of beginning over.
Robocopy additionally prints a log of each file it copied, skipped, or could not entry, which makes verifying the switch a look as a substitute of a guess. If a file fails as a result of one other course of locks it, has a permissions problem, or has a path that is too lengthy, it tells you which of them one and retains going.
/MIR deletes information within the vacation spot that do not exist within the supply. In case you’re copying right into a folder that already has knowledge you need to hold, drop the flag and use /E as a substitute. /E copies subdirectories with out the damaging sync.
For one-off transfers, dragging information is ok. Nonetheless, for backups, drive migrations, or something massive sufficient {that a} failed copy midway via would truly harm, Robocopy is the one built-in possibility I belief to complete the job.
Confirm any downloaded file with Get-FileHash
A ten-second examine is all that stands between you and a tampered installer
Screenshot by Yasir Mahmood
Most individuals set up software program the identical manner by downloading the installer, double-clicking it, and hoping for one of the best. Nonetheless, respected obtain pages publish a hash worth subsequent to their hyperlinks particularly as a result of that hope is doing numerous work. A hash is a singular fingerprint for a file, and even altering a single byte modifications it fully.
Get-FileHash generates that fingerprint domestically, so you’ll be able to examine it towards the developer’s printed worth earlier than you run something. To examine a file:
- Proper-click Terminal and decide Run as administrator.
- Kind Get-FileHash adopted by the total path to the file, like Get-FileHash C:UsersPCDownloadslogioptionsplus_installer.exe.
- Hit Enter and anticipate the SHA256 string to seem.
Evaluate that string to the one on the obtain web page. In the event that they match, the file is precisely what the developer launched. If they do not match, even by one character, the file was both corrupted throughout obtain or tampered with someplace alongside the best way, and also you should not open it.
It takes about 10 seconds and is among the least expensive methods to examine whether or not a downloaded file is secure earlier than utilizing it.
Get well any saved Wi-Fi password in seconds
Home windows has been protecting the password for you
Forgetting your Wi-Fi password is a type of small issues that turns into an enormous one quick — a visitor asks for it, your telephone wants reconnecting, a brand new good plug refuses to arrange, and all of a sudden you are flipping the router over to learn the sticker that no one’s touched in three years.
Home windows has been quietly storing the password the entire time. Netsh will hand it again to you. Here is how:
- Open Terminal as administrator.
- Kind netsh wlan present profiles to record each community your PC has ever related to.
- Kind netsh wlan present profile title=”YourNetworkName” key=clear, changing the title with the one you need.
- Look underneath Safety settings for the Key Content material line — that is the password.
It really works for any community the laptop computer has saved, not simply the one you are at present on. Useful while you’ve modified routers, traveled, or simply cannot bear in mind which password belongs to which community.
The one catch is that you just want administrator rights for the password to really show. With out them, netsh exhibits the community particulars however blanks out the important thing subject.
Observe down the app consuming your CPU with Get-Course of
A nonetheless snapshot beats a Process Supervisor record that will not sit nonetheless
Screenshot by Yasir Mahmood
Process Supervisor is the apparent selection when the laptop computer fan kicks into jet engine mode, however its Processes tab retains reshuffling as you scroll, and the CPU column updates so quick that catching the precise wrongdoer takes longer than it ought to. Get-Course of provides you a clear snapshot as a substitute.
The command pulls all operating processes, types them by CPU time, and prints the highest offenders to a listing that does not transfer. To make use of it:
- Open Terminal (administrator rights aren’t required for this one).
- Kind Get-Course of | Type-Object CPU -Descending | Choose-Object -First 10 and hit Enter.
- Learn the record. The method consuming essentially the most CPU sits on the prime.
If you wish to kill no matter’s misbehaving, reminiscent of Chrome, Cease-Course of -Title “chrome” -Drive ends each occasion of that course of instantly. You may swap “chrome” for no matter’s on the prime of your record.
It is also higher at surfacing background processes that Process Supervisor tucks underneath the “Home windows processes” group. A runaway service or a caught replace part exhibits up right here as plainly as a frozen browser, which makes diagnosing bizarre slowdowns lots much less of a guessing recreation.
A number of keystrokes beat a dozen clicks
Decide the command that solves an issue you truly hit. Use Winget in case your apps go months with out updates, Robocopy earlier than your subsequent huge drive migration, and Get-FileHash the following time you seize an installer from someplace unfamiliar. As soon as certainly one of these earns its spot in your routine, the remaining observe naturally. Pin Home windows Terminal to the taskbar so it is all the time one click on away while you want it.